Well, It has not rained yet today. It has been raining for 2 weeks. Everything is soggy, even the dry creek was flowing. I stayed out in the sun with the pup so I could get some Vite.D
I have been doing my treadmill, with my daughters and my son -in-law [Mark] even had a turn spotting me. I started at 2 min. last Tuesday and now today I did 14 min. I also bought resistance bans to use 3 times a day...I definitely want to try to get rid of wheelchair....It's gonna take a while I have been in it since Aug.2016. I try to increase 2 min a day we'll see what happens when I reach 20 min.....I guess no pain no gain.......but the left leg sure does hurt when I do this. It all because the bone has not healed together. I guess the rod and screws hold it , but it needs to heal. I am also using a bone growth stimulater 10 hrs every day.
If not healed by my next six weeks checkup he wants to put me under in the hospital and go in with needle to see if there is an infection or something causing it not to heal
On a brighter note I have been playing with Painnt app to get ideas for paintings
Thursday, May 31, 2018
Wednesday, May 30, 2018
Melting & Molding Soap : Loofah Scrubby Soap
nice little tutorial.... I USE A SILICON MUFFIN TIN FOR MINE AND THEN WHEN FINISHED i TIE A ROPE ON IT THROUGH ONE OF THE HOLES IN THE LOOFHA
Tuesday, May 29, 2018
sjcountrycrafts Scented Fluffies
I still make scented fluffies,,,,,,,,,,,,,,I have brown and tan bears and a few white left that I ca dip.They are great for bathrooms or for a bed room , they last for months and you just warm with a hairdryer to refresh,,I also like the spice scents for the kitchen area.. contact at sjcountrycrafts@gmail .com for info
great for dorm rooms or if you have small children and don't want lit candles ADD fragrance without flames
pRE- K prom day
My favorite little one had a special day at school.............. they had a prom day full of fun things to do....but first she had to show off her [prom] dress just like her big sister did last month.
Monday, May 28, 2018
DIY QUILLED PAPER NECKLACE
- Craft glue
- This looks really cute and I am interested in making it
- Quilling strips (4 mm)
- Quilling needle
- Tweezers/plucker
- Colour brush
- Scissor
- Glue gun
- Craft wire
- Beads
- Jump rings
- Hooks
- Pliers
- Take the quilling needle and 4 mm long pink quilling strip. Quill the strip using the needle and prepare quilled small rolls. You can apply some glue at the end and stick the roll. Prepare such multiple rolls using the quilling stripes. We need to give a ‘drop’ or flower petal shape and a 3d effect to the rolls. Take the roll and press the inner spirals using the needle. Using the tweezer, stretch the topmost layer, press the roll and prepare a petal shape. Perform this with all the rolls you made.
Now, choose yellow colored quilling strips for a unique look. Prepare the rolls just like the pink quilling strips and apply glue at the ends to stick the rolls. Make such multiple yellow quilled rolls and press the inner spirals of the roll using the needle for the embossed effect. We won’t change the shape of these rolls as we will use it in the center of the flower and thus, will keep them around.It’s now time to arrange the flowers in a necklace pendant shape. Arrange the flowers as a pendant. Apply some glue and stick all the 5 flowers and let it dry. Arrange the flowers with no gaps in between and make sure you make a broad U shape. Stick all the flowers together in an easy way. Turn the flowers set around and apply glue to the flowers to let them stick properly.
It’s time to prepare a flower using both the quilled rolls. Take the yellow roll, place it in the center and arrange the pink quilled petals around the yellow roll. Using craft glue, stick the petals to the yellow roll and form a beautiful flower. Prepare such 5-6 flowers for making the neckpiece.
To make the necklace more pretty and stylish, we will add some beads. On the yellow quilted rolls, apply some glue and stick beads on all of them. Use tweezers to stick the beads without getting glue on your fingers
.
We now need to prepare the chain of the necklace. We will make a chain using craft wire which can remain stable and can easily accommodate the quilled paper pendant we made. Thus, prepare 2 pink quilled paper roll as before. Take a craft wire and bend it from the center. Insert the pink quilted roll in the wire. Now start filling both the sides of the wire with golden decorative beads. Once completed, merge the ends of the wire using plier. Similarly, prepare the other side of the chain using the same method. Pick a wire, insert the roll, fill with beads and connect the ends using pliers.
On one wire chain, attach a jumper while on the other attack a hook. Use the pliers to carefully attach the hooks. Choose golden jumpers and hooks to make the chain look even and gorgeous.
Once, both the wire ends are ready it’s time to stick the pendant to this chain. Take the quilled paper floral pendant and stick it to the chain using glue. Apply some glue on the edges of the pendant and on the role of the chain and connect them. Let it get dry and here is your amazing quilled paper necklace ready.
HAPPY MEMORIAL DAY
Hi ,
I’m truly Thankful for all my friends and cousins who have served…………..please remember them all, especially the fallen and the wounded who can never be the same again.
THESE MEN AND WOMEN SHOULD NEVER BE FORGOTTEN!!!!!!
My cousin
Mary beth Youngman
Carrie McKenzie
Josh Mc Climans just to name a few………………………
and many more for us to HONOR both alive and fallen
Friday, May 25, 2018
Another shooting?
65 |
When I started down here the buses were 65 passengers and then we went to 77 and 84...some of the buses had an aide which would help and others didn't.. you figure you are driving down the road ,trying to concentrate on driving while yo have that many children behind you ...at least you are facing them in the classroom and NOT DRIVING!! I feel every bus should have an aide even if it would be a parent volunteer because the money is tight..it surely would help
Thursday, May 24, 2018
30 min. Chicken and Dumplings
PREP TIME: 5 MINSCOOK TIME: 25 MINSTOTAL TIME: 30 MINS
INGREDIENTS
- 4 cups chicken broth
- 1 cup water
- 2 tablespoons unsalted butter
- 2 teaspoons poultry seasoning
- 1 teaspoon onion powder
- 1 teaspoon garlic powder
- 1 teaspoon kosher salt
- 1 teaspoon dried parsley
- 1 teaspoon dried basil
- 1/2 teaspoon black pepper
- 1 pound boneless, skinless chicken breast
- 1 cup all-purpose flour
- 3 cups milk
- 2 cups frozen peas and carrots
DUMPLINGS
- 2 cups all-purpose flour
- 1 tablespoon baking powder
- 1/2 teaspoon kosher salt
- 1 tablespoon butter (softened)
- 1 cup milk
INSTRUCTIONS
- In a heavy bottomed Dutch oven or large wide pot, over medium heat, add chicken broth, water, butter and all seasonings (poultry seasoning, onion powder, garlic powder, salt, parsley, basil, and pepper). Cover and bring to a boil.
- Meanwhile, cut chicken breast into bite sized pieces. Add to the pot. Stir to combine and cover.
- In a sealable container (such as a large mason jar) combine flour and milk. Seal tightly and shake vigorously to combine well. You will create a smooth flour mixture for thickening your sauce called a slurry. Slowly pour the slurry into the pot, stirring constantly. Add frozen vegetables and cover.
- Meanwhile combine dumpling ingredients in a medium bowl. Mix well with a fork. Remove cover from the soup pot and stir well.
- Drop dumplings into the soup one tablespoon at a time, use a 1 tablespoon scoop to make it even easier. Reduce heat to simmer, cover and cook until soup is thick enough to coat the back of a spoon, about 10 minutes.
http://www.theslowroasteditalian.com/2012/11/chicken-and-dumplings-in-30-minutes-2.html
Wednesday, May 23, 2018
TEMTATION
After looking at chocolate goodie bakes for a few hours my brother come home with this:
and then when I open the fridge I see this
oh and buy the way he was feeding the dog pistachios and he liked them
and then when I open the fridge I see this
oh and buy the way he was feeding the dog pistachios and he liked them
MORE CHOCOLATE TO DIE FOR
Prep Time
15 mins
Total Time
15 mins
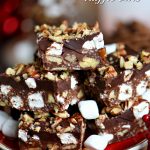
Heavenly Hash Truffle Bars are loaded with coconut, pecans, marshmallows and chocolate and topped with a decadent ganache. This incredibly easy treat comes together in minutes and is sure to impress the chocolate lover in your life!
Ingredients
- 2 cups semi-sweet chocolate chips
- 1 14 oz can sweetened condensed milk
- 1 1/2 cups miniature marshmallows
- 1 1/2 cups roughly chopped pecans
- 2 cups unsweetened shredded coconut
- 1 cup miniature marshmallows
Topping
- 10 oz bittersweet chocolate
- 1/2 cup heavy whipping cream
- 1/2 cup finely chopped pecans
Instructions
- Line a 9x13 baking dish with parchment paper and set aside.
- In a large microwave-safe bowl, combine the semi-sweet chocolate chips and sweetened condensed milk.
- Microwave on high heat in 30 second intervals, stirring in between, until chocolate is melted and mixture is smooth.
- Stir in marshmallows, pecans, and coconut.
- Spread mixture into prepared baking dish.
- Top with another cup of miniature marshmallows and press down gently.
- Chill until set.
Topping
- Place bittersweet chocolate in a heat-proof bowl.
- Heat whipping cream until scalding hot and pour over the top of the chocolate.
- Let sit for 5 minutes and then stir until smooth. (If chocolate hasn't melted all the way, heat on high heat in 15 second intervals in the microwave, stirring in between, until chocolate is fully melted.)
- Pour mixture over the top of the chilled bars and use an offset spatula to spread over the top of the marshmallows.
- Sprinkle the chopped pecans over the top and chill again until set.
- Cut into bars and serve.
MINT CHOCOLATE BROWNIES
Mint Chocolate Brownies
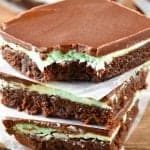
These easy Mint Chocolate Brownies are a family favorite! Everyone always asks for the recipe for these amazing brownies! Because who can resist brownies with mint frosting?
Ingredients
- 1 box of fudgey brownie mix
- 2 cups powdered sugar
- 8 TBSPs of butter softened like almost melted
- 2 TBSPs milk
- dash of green food coloring
- 1 1/2 tsp mint extract
- 6 ounces semi-sweet chocolate chips
- 8 TBSPs of butter
Instructions
- Bake up your brownies in a 9by 13 inch pan. Let cool in the refrigerator for a half hour (at least).
- Combine the powdered sugar, milk, butter, green food coloring, and mint extract. Pour over the cooled brownies and smooth out with the back of a spoon. Refrigerate for another half hour.
- Melt the chocolate chips in butter in the microwave or a small saucepan over medium-low heat. Pour over the chilled brownies & mint. Tip the pan to make it spread evenly. Pop back in the refrigerator to let it set, at least a half hour.
- To make slicing easier, dip your knife into a hot glass of water and wipe off the excess water between each slice into the brownies.
found this on https://www.wineandglue.com/mint-chocolate-brownies/ I need to make these
Tuesday, May 22, 2018
BARN STAR WREATH
Aluminum Can Barn Star Wreath ............................I LOVE THIS IDEA
For some reason, I have barn stars on the brain. I notice them everywhere!
Except on wreaths.
Until now.
Husband and I don’t drink a lot of soda, usually as a treat or for some special occasion. Luckily, I came into a bunch of empty pop cans that I didn’t have to drink by throwing my mom a surprise birthday party. You don’t have to acquire your aluminum cans that way. Call a buddy, ask a friend, or heck, treat yourself to a beverage all in the name of making a Fourth of July wreath.
Who knew patriotism could be so tasty?
You will need:
9 clean and empty soda pop cans or aluminum flashing
Tin snips
Anti- cutting work gloves
Paper
Pencil
Ruler
Scissors
Gorilla Tape
Red spray paint for metal
Blue spray paint for metal
Grape vine wreath
Red ribbon
White ribbon
Blue ribbon
Optional: Cardstock circles (I cut mine from a pasta box)
Disclosure: I am including some affiliate links in this post for your convenience
Make it:
1. Make a paper template. Use the ruler and pencil to draw a kite shape that is two inches long at the top and four inches wide at the bottom. Cut the template out with your scissors. You will use this pattern to cut out your star points.
2. Wearing the work gloves, use the tin snips to cut the top, bottom, and side of the pop cans using the diagram below.
4. Use the ruler and pencil to make a score line down the center of each star point.
5. Fold each star point in half following the score line on each star point.
7. Spray paint one pop can star blue.
8. Spray paint one pop can star red
9. Weave a length of ribbon around the grapevine wreath. Tie the ends of the ribbon into a bow.
Optional: If your stars will not lay flat or stay open, tape a circle of cardstock to the center back of the star.
Except on wreaths.
Until now.
15K+ I painted my stars red, white, and blue but you can paint your stars whatever color you like!
Husband and I don’t drink a lot of soda, usually as a treat or for some special occasion. Luckily, I came into a bunch of empty pop cans that I didn’t have to drink by throwing my mom a surprise birthday party. You don’t have to acquire your aluminum cans that way. Call a buddy, ask a friend, or heck, treat yourself to a beverage all in the name of making a Fourth of July wreath.
Who knew patriotism could be so tasty?
How to Make Soda Pop Can Stars
15K+ I left one of my stars silver instead of painting it white because I like how the silver looks against my twig wreath.
You will need:
9 clean and empty soda pop cans or aluminum flashing
Tin snips
Anti- cutting work gloves
Paper
Pencil
Ruler
Scissors
Gorilla Tape
Red spray paint for metal
Blue spray paint for metal
Grape vine wreath
Red ribbon
White ribbon
Blue ribbon
Optional: Cardstock circles (I cut mine from a pasta box)
Disclosure: I am including some affiliate links in this post for your convenience
Make it:
1. Make a paper template. Use the ruler and pencil to draw a kite shape that is two inches long at the top and four inches wide at the bottom. Cut the template out with your scissors. You will use this pattern to cut out your star points.
2. Wearing the work gloves, use the tin snips to cut the top, bottom, and side of the pop cans using the diagram below.
Be careful handling the cut pop can. The edges may be sharp.
Photo courtesy of my food blog Lazy Budget Chef
3. Trace the star point pattern onto the open soda can and cut it out with the tin snips. I got two star points from one 12 ounce can. You will need five star points for each star.4. Use the ruler and pencil to make a score line down the center of each star point.
5. Fold each star point in half following the score line on each star point.
Tip: I think the stars are easier to spray paint if you make them by folding the star points silver side out
6. Use the Gorilla Tape to attach the two inch top of the star points to each other to make a star shape.
Duct tape will probably work for this project too. I used Gorilla Tape because it is the first thing I grabbed off the tape shelf in the garage.
7. Spray paint one pop can star blue.
8. Spray paint one pop can star red
9. Weave a length of ribbon around the grapevine wreath. Tie the ends of the ribbon into a bow.
I looped a length of red, white, and blue ribbons around my hand, tied them in the center with the tails of the woven ribbon and fluffed the ribbon to make the bow.
9. Glue or tape the soda can star to the grapevine wreath. I taped mine soda can stars to the wreath so I can change the wreath décor with the seasons.Optional: If your stars will not lay flat or stay open, tape a circle of cardstock to the center back of the star.
Singing Counting Stars while you are working on this project is optional but encouraged.
It is one of Husband’s favorite songs. He sings it all the time!
10. Hang it up and admire!
Subscribe to:
Posts (Atom)
Best Bud
He is my best friend,he stays right by my side . I wonder how he will react when hopefully I don't need the w/c anymore. ...
-
Good Ole Fashion Mac and Cheese Ingredients : 3 cups dry elbow macaroni 4 Tbsp salted butter 2 (370 mL/12 oz) cans evaporated milk 1/3 cup m...
-
1. Peppermint – This is the most popular mint for medicinal uses because it contains high amounts of the volatile substance menthol. It ...
-
Ingredients: 1 cup chopped Pecans 2 c all purpose flour 1 1/2 c sugar 2 eggs 1 tsp baking soda 1 tsp vanilla pinch salt 1 – 20 oz can ...